This article was written to help anyone who is attempting to follow the instructions found at that URL - especially for those trying to locate the icons to press during the process. This article is also designed to be architecture friendly as possible. This means that you can run it on almost every OS, be it a MacIntosh, Windows, and almost all flavors of Linux.
First make sure that you have installed Oracle's Java JDK and Google's Android Studio on the PC that will be used. Then click here, read the introduction and then click the 'Get started' link and follow the instructions below.
- Read 'Create an Android Project' section first, then implement them. This is similar to the instructions in my article in STEP 4. Once completed, click on the 'Run your app' link.
- Read 'Run Your App' section first, then implement them. This is similar to the instructions in my article in STEP 6 and STEP 7, except it is in the reverse order. Once completed, click on the 'Build a Simple User Interface' link.
- This is where this article provides you with additional information on where the various icons are located in your Android Studio IDE. In the section titled 'Open the Layout Editor', item (2), you can either click on the items in the menu or click the Project icon, as indicated by the red arrow below.

Item (3) mentioned the 'Design' tab and this is indicated by the red arrow as shown below.

Item (4) mentioned the 'Show Blueprint' icon and this is indicated by the red arrow as shown below.

Item (5) mentioned the 'Hide Constraint' icon and this is indicated by the red arrow as shown below.

Item (6) mentioned the 'Turn On Autoconnect' icon and this is indicated by the red arrow as shown below.

Item (7) mentioned the 'Default Margins' icon and this is indicated by the red arrow as shown below.

Item (8) mentioned the 'Device in Editor' icon and this is indicated by the red arrow as shown below.

- After confirming that what you have seen in Android Studio resembles what you see in the instructions, you can proceed with the next steps. Else go back and check your work.
- In the section titled 'Add a text box', item (1) mentioned the 'TextView' in the 'Component Tree' which is indicated by the red arrow as shown below.
- In the same section, item (2) mentioned the 'Palette' window and the 'Plain Text' in the design window which is indicated by the red arrows as shown below.
- In the same section, item (3), item (4), and item (5) gives the instructions for creating a EditText widget on the design editor.
- After confirming that what you have seen in Android Studio resembles what you see in the instructions, you can proceed with the next steps. Else go back and check your work.
- In the section titled 'Add a button', item (1) mentioned the 'Palette' in the 'Widgets' and 'Button' which is indicated by the red arrow as shown below.
- Item (2) asks you to create a constraint between the button and the text box. The result is as shown in the figure below.
- Item (3) asks you to create a constraint between the text baselines. The Baseline Constraint icon is as shown in the figure below via the red arrow. The final result is as shown in the figure.
- After confirming that what you have seen in Android Studio resembles what you see in the instructions, you can proceed with the next steps. Else go back and check your work.
- In the section titled 'Change the UI strings', the 'Show Design' icon was mentioned. This can be found in Android Studio as indicated by the red arrow below.
- In the same section, item (1), it was required that you open the 'strings.xml' file. To do so, first you have to click the 'Projects' icon - the 'Projects' window will replace the 'Palette' window. Now navigate the 'app' folders (by clicking on the 'arrows' to the left of the name) to find the 'strings.xml' file. Double-click on the name of the file to open it as shown.
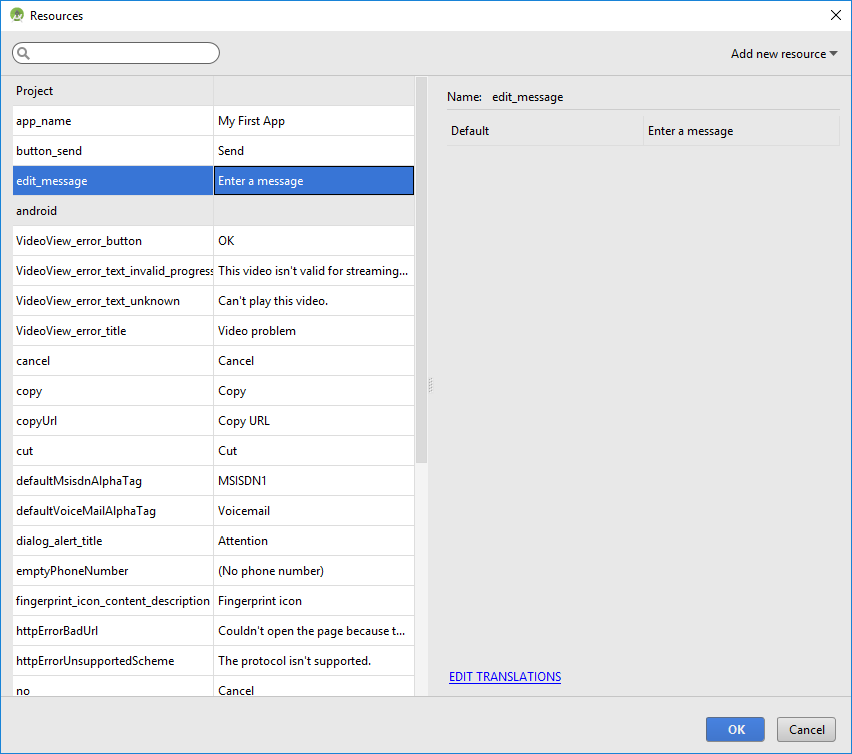
- In item (2), you are asked to open the 'Translation Editor'. This item can be found at the place indicated by the red arrow in the figure below. The window as shown below will appear.
- In item (3), you are asked to add a key. This 'Add Key' icon can be found at the place indicated by the red arrow in the figure below. Repeat the procedure for item (4).
- In the following section, item (1), says to make sure that the 'Properties' window on the RIGHT sidebar is visible. This is where the confusion lies - especially when Google uses the WRONG icon to denote the 'Properties' item. The icon as shown can only be found on the LEFT sidebar (under the '7:Structure' words) as shown by the red arrow in the figure below. Note the 'Properties' window will automatically be revealed once you select the correct item in the design pane.
- As indicated by the instruction (2), locate the 'hint' property and click on the 'Pick a Resource' icon as shown by the red arrow in the figure below. Then double-click on the edit_message item.
- As per instruction (3) delete the text property as shown by the red arrow.
- As per instruction (4) locate the text property as shown and click on 'Pick a Resource' icon as shown by the red arrow. Then double-click on the button_send item.
- In the following section titled 'Make the text box flexible', which says to click on the 'Show Blueprint' icon. The correct icon is as indicated by the red arrow in the figure below. Press it to continue.
- In the same section and as per instruction (1) click 'Center Horizontally' as shown by the red arrow below. After confirming that what you have seen in Android Studio resembles what you see in the instructions, you can proceed with the next steps. Else go back and check your work.
- As per instruction (2) set the right and left margins of the button to 16dpi as shown by the red arrows in the figures below.
- As per instruction (3) set the only the left margin of the text box to 16dpi as shown by the red arrow in the figure below.
- Still viewing the text box properties, click the width indicator as shown by the red arrow in the figure below. Keep clicking until you see the 'Match Constraints' words, as in figure 33 below.
- After confirming that what you have seen in Android Studio resembles what you see in the instructions and the figure below (as indicated by callout 1), you can proceed with the next steps. Else go back and check your work.
- After confirming that what you have seen in Android Studio resembles what you see in the instructions as shown in the figure below, you can proceed with the next steps. Else go back and check your work.
- If it seems your layout did not turn out as expected, check your XML code with the one given in the instruction - they should be similar. If your attributes appear in a different order, that's okay.
- In the following section titled 'Start Another Activity', item (1), add the sendMessage() method stub to the MainActivity.java file as shown. You will see an error because Android Studio cannot resolve the View class used as the method argument. Click to place your cursor on the View declaration, and then perform an Alt + Enter (or Option + Enter on Mac) keypress. Then, select Import class from the menu.
- In the activity_main.xml file, click on the button and locate the onClick property. Then select sendMessage [MainActivity] from the drop-down list as indicated by the red arrow in the figure below.
- In the following section titled 'Build an Intent', add the EXTRA_MESSAGE constant and the sendMessage() code as shown below. Android Studio will again encounter Cannot resolve symbol errors, so place the cursor on the errors, and press Alt + Enter (or Option + Return on Mac) to resolve the errors (except for DisplayMessageActivity which will be resolved soon).
- In the following section titled 'Create the second activity', items (1) and (2), create an empty activity (see below) and enter 'DisplayMessageActivity' for Activity Name and click finish as shown below.
- In the following section titled 'Add a text view', items (1), select the activity_display_message.xml file as shown below.
- In the same section, items (2), click Turn On Autoconnect in the toolbar as shown below.
- Create a TextView from the palette, and place it on the layout. Then create one more constraint from the top of the text view to the top of the layout. The layout should look like the figure shown.
- In the following section titled 'Display the message', items (1), add the code to the DisplayMessageActivity.java file as shown in the figure below. Android Studio will again encounter Cannot resolve symbol errors, so place the cursor on the errors, and press Alt + Enter (or Option + Return on Mac) to resolve the errors.
- In the following section titled 'Add up navigation', add the code to the AndroidManifest.xml file as shown below.
- Run the app and you are done!


NOTE: It does not matter if the figure shows API 26 or API 25. The instructions were written when Android Oreo 8.0 was still not available.